 THE OVERBUILDER
How to use
the world planner.
The planner works backwards. You name something you want and how much of it per minute, and it tells you every machine, every belt and every watt it takes to get there — from the game's own recipe data. Then you stack those factories into a plan for the whole map.
Open the plannerBuild your first factory
Open the planner and switch to Chain builder. Five steps and you have a factory.
- Pick a goal. Type into the filter box to narrow the list — around 127 items are offered, everything the game can make from map resources.
- Set a rate. Type a number of items per minute, or hit one of the quick chips (5, 10, 20, 30, 60, 120, 240). Fluids are in m³/min.
- Press Preview. The chain appears: the goal at the top, everything it demands underneath, raw ore at the bottom. Each box shows the building, how many of them, and the rate flowing through.
- Choose alternates. Only alternates that apply to the chain you just previewed appear in the list, so it stays short. Tick one and the chain redraws immediately.
- Name it and press Save. It joins the world plan on the dashboard.
Preview changes aren’t added to your world plan until you press Save. Your saved world plan updates automatically in this browser. Use Export to keep a backup; learn about saving and sharing.
Try it: 20 Iron Plates per minute
For a small first factory, leave the world’s machines setting at 100% and miners at 250%. In Chain builder, select Iron Plate, enter a rate of 20, and press Preview. Leave the optimizer, alternate recipes and imports off for this example.
Read the chain from the goal down: 20 Iron Plates/min needs 30 Iron Ingots/min, which needs 30 Iron Ore/min. At these settings, the preview lists one Constructor, one Smelter and one Miner Mk.3. The miner has spare capacity; you’re only using 30 ore per minute.
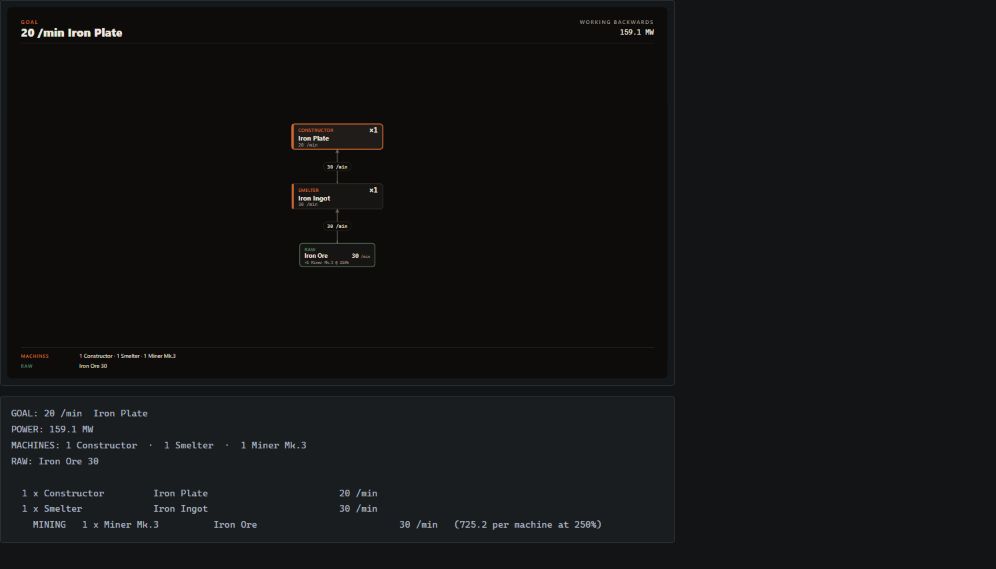
Name the factory Starter Iron Plates and press Save. Switch to Dashboard: look for it in Factories, and check that the Iron Ore resource card now includes its 30/min demand. Existing factories in your plan contribute their own demand too.
The chain builder
Rate and Max out
Max out answers a different question: how much of this could the rest of the world actually supply? It looks at what's left in the resource budget after every other factory has taken its share, and at what your existing plants and factories produce, and fills in the largest rate that still works. It tells you which resource is the binding one.
For items made from power-plant byproducts — nuclear waste, for instance — it also searches the fuel chain's alternates, singly and in pairs, and reports the map's real ceiling rather than the one you get on standard recipes.
Alternate recipes
The list shows alternates that touch the chain on screen, plus standard recipe choices — places where the game gives you two non-alternate recipes for the same item and the solver would otherwise quietly take the first one. Ficsite Ingot from iron, aluminium or caterium is the obvious one; Fuel versus Residual Fuel is another.
Without a choice, the solver prefers recipes whose primary product is the item you want, standard over alternate, and avoids anything that depends on a byproduct-only input or loops back on itself.
Preview, zoom and PNG
Big chains get big. The canvas grows past 4K rather than shrinking boxes below legibility — a Thermal Propulsion Rocket chain runs to 48 items. Use Fit, − and + above the preview to move around it.
Download PNG gives you the whole diagram at 3840×2160 with the machine list and raw totals in the footer — the version to drop into a video or a planning doc.
Imports and routes
Real factories don't smelt their own ore. Once you've previewed a chain, the Import from another factory list fills with everything in it, and you decide what this factory makes and what it belts in.
- Intermediates get a tick box. Tick one and it stops being manufactured here and becomes an import — the box turns amber and reads supplied, not made here.
- Raw resources get All / Half / None plus an amount box, so a factory can mine some of its ore on site and belt the rest in.
- Sources. Once something is imported, a source picker appears listing every factory in your plan that makes it. You can name more than one source and give each a rate; leave the last one blank and it takes the remainder.
Sources are what drive the Routes table on the dashboard — who feeds whom, at what rate, over how many belts or pipes, and whether the source has any spare left. Anything you haven't assigned shows up under Unassigned so nothing goes quietly missing.
Mining outposts
Raw resources are goals in their own right — pick Coal — mining outpost and you get a one-step extraction chain: miners, their power, and the tonnage drawn from the world budget.
When the goal is a raw resource, a Node purity selector appears. This matters more than it looks. At 250% a Miner Mk.3 pulls 1,200/min from a pure node, 600 from a normal one, 300 from an impure one — so telling the planner which nodes you're standing on is the difference between one miner and four.
On the dashboard, outposts are kept apart from real factories in a collapsible Mining outposts section, grouped by name so ninety of them don't bury everything else.
The optimizer
The normal builder works strictly backwards, one recipe per item. That breaks down in three cases, and the Optimizer tick box handles all three:
- Recipe loops. Recycled Plastic and Recycled Rubber feed each other. Only the optimizer can solve that circle.
- Several outputs at once. Add extra output rows and it balances them together instead of running two separate chains.
- "As much as these nodes allow." Leave an output's rate blank and it maximises instead. Give it a per-resource limit mined here so it knows what the site actually has.
Each raw input also takes an extractors count — how many miners or pumps really sit on that site — so the power and machine totals match what you'll build rather than a map average.
It picks the plan that uses the least scarce resource first, then the fewest machines, then leaves the least surplus. Optimizer factories carry an OPT badge on the dashboard and list every output they make.
The dashboard
Five tiles across the top, then the detail.
- World usedThe share of every finite node on the map your plan has claimed, at the miner clock. This is the number to watch if you're chasing 100%.
- PowerDemand against capacity, with the headroom. Turns amber past 90% and red when you're short. Geothermal and Alien Power Augmenter boosts are folded in.
- MachinesProduction buildings, plus generators counted separately.
- Power shardsWhat you need against what the map's slugs give you. Amber when the shortfall has to be made up with synthetic shards.
- FactoriesFactory and plant counts, and how many are marked temporary.
Below that: the Resource budget — a card per resource with a bar, what's allocated, what's left, and a warning if you've gone over. Then Factories and Power plants, each row with its outputs, machines, power and raw draw, and Edit / Duplicate / Diagram / Remove.
Further down, sections appear as they become relevant: Build order, Routes, Item coverage (every item moving between factories, with a covered-or-short verdict and belt counts), Byproducts, and Machine count by type.
Duplicate is how you go from one mine to ninety. It asks for a count and makes numbered copies, and the dashboard groups them back into one line.
Clocks and power shards
Clocking works at three levels, each falling back to the one above it.
- The whole plan. The machines setting in the header sets the default for everything.
- One factory. A factory can override it — handy for a starter base sitting at 100% while the rest of the world runs at 250%.
- One machine. Open per-machine clocks in any factory's Machines cell and each production step gets its own row: 100%, 200% and 250% presets, plus a box that takes any value from 1 to 250. Blank the box and that step goes back to the factory clock; reset all clears the lot.
This is worth doing rather than leaving everything at 250%. Overclocking costs power on a curve — a machine at 250% draws far more than two and a half times its base — and it costs one power shard per 50% over 100, per building. Only the machines you actually overclock pay either price, so pushing one bottleneck step to 250% and leaving the rest alone is dramatically cheaper than pushing the whole factory.
A factory running more than one clock gets a MIXED badge, and the Machines tile says how many are mixed. Diagrams label each box with its own clock.
Miners are clocked separately by the miners setting, because miner clock decides how much the map can supply in the first place. The shard tile splits factory shards from miner shards so you can see which is eating your slugs.
Phases, build order and temporary factories
A plan for a whole map isn't built in one sitting, so every factory and plant can carry a phase number and a temporary flag, both set inline on the dashboard row.
- Phase is your tier band — when in the playthrough this thing gets built. Outpost groups have a group-level control so you can phase ninety mines at once.
- Temporary marks the scaffolding: the early factory that holds you over until the real one is unlocked. Temporary entries are left out of every end-state total — budget, power, machines, shards, routes — unless you tick count temporary in the header.
Build order then sorts the whole plan by phase, and within a phase puts sources before the things they feed. Anything without a phase that feeds a phased factory inherits one. It warns you when a factory needs something that isn't built until later, when a permanent factory leans on a temporary one, and when two factories depend on each other.
World settings
- miners %The clock every extractor runs at. This sets the map's total supply, so it changes the resource budget itself.
- machines %The default clock for production buildings — overridable per factory and per machine.
- geothermalWhether the map's geysers count towards power capacity.
- sloop slugsA Somersloop in the shard constructor doubles every slug's shards. On by default.
- belts / pipesThe tier used for every lane count in the plan. Mk.1–6 belts, Mk.1–2 pipes.
- count temporaryFold temporary factories into the totals instead of excluding them.
Saving, exporting and sharing
Your plan lives in your browser. There are no accounts and nothing is uploaded.
- It saves as you work, in this browser on this device. Clearing site data clears the plan, and it won't follow you to another machine on its own.
- Export writes a
.jsonfile. This is your backup — take one before anything drastic. - Import loads one back.
- Share link packs the entire plan into the URL itself, compressed. Send it to someone and they open your plan; nothing passes through a server on the way.
- New starts an empty plan. Export first.
Only your inputs are stored — goals, rates, recipe choices, imports, clocks — and everything is recomputed when the page loads. A plan of 163 factories reloads in well under a second.
Things worth knowing
- Amber boxes are not made here. When a chain ends in an amber, dashed box reading supplied, not made here, that item has to come from somewhere else — a power-plant byproduct like nuclear waste, or something you chose to import. The chain summary lists them as NEEDS lines.
- Byproducts don't loop back on their own. The normal builder won't feed a byproduct into another step of the same chain. If you want that — making Dark Matter Residue as a byproduct rather than from fresh SAM, say — either import the byproduct from the factory that already makes it, or use the optimizer.
- Importing beats re-making. If two factories both manufacture the same intermediate from scratch, you're paying for it twice in the resource budget. Import it from one source and the routes table will tell you whether that source has the spare.
- Extractor power sits at the miner clock. Miners and pumps are always counted as whole machines at full miner-clock power — a Miner Mk.3 at 250% is 151 MW, and that adds up fast across ninety outposts.
- Water is never short. It's treated as unlimited, so it never appears as a shortfall — but the extractors and their power are still counted.
- The recipe data is the game's. Everything comes from Satisfactory's own docs file, so rates, power figures and alternates match the version it was extracted from rather than a wiki someone forgot to update.
Go and plan something.
The fastest way in is to pick one thing you actually want and press Preview. The rest of the map follows from there.
Open the planner Explore Project Saturation